Self-Massage and DIY Techniques

Self-Massage and DIY Techniques

Self-Massage and DIY Techniques

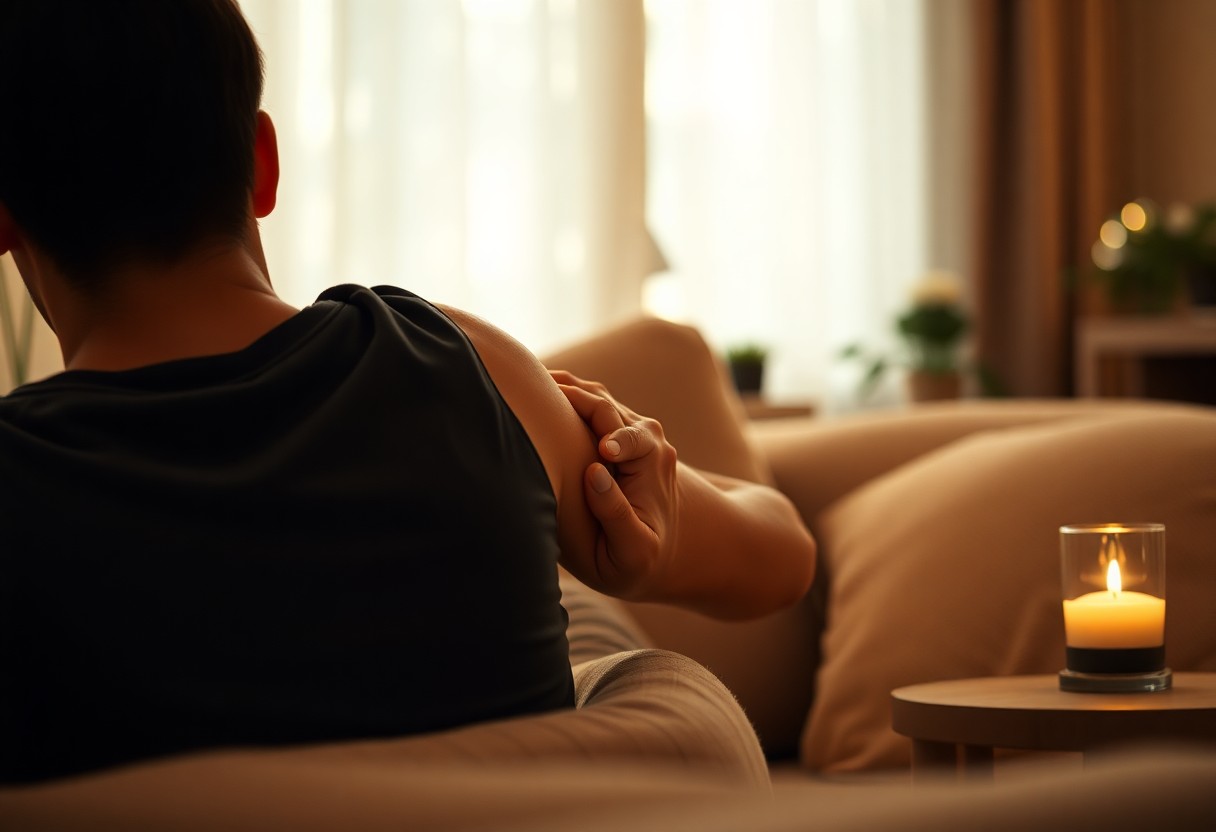
Many people underestimate the benefits of self-massage and DIY techniques for relieving tension, improving circulation, and promoting relaxation. By incorporating simple strategies into your daily routine, you can enhance your well-being and effectively manage stress. This guide will equip you with various methods and tools to perform self-massage, allowing you to take charge of your physical and mental health from the comfort of your home. Discover how to create a personalized self-care experience that suits your lifestyle and uniquely addresses your needs.

Key Takeaways:

  • Self-Assessment: Before applying any self-massage techniques, it’s important to identify tension areas in your body that need attention.
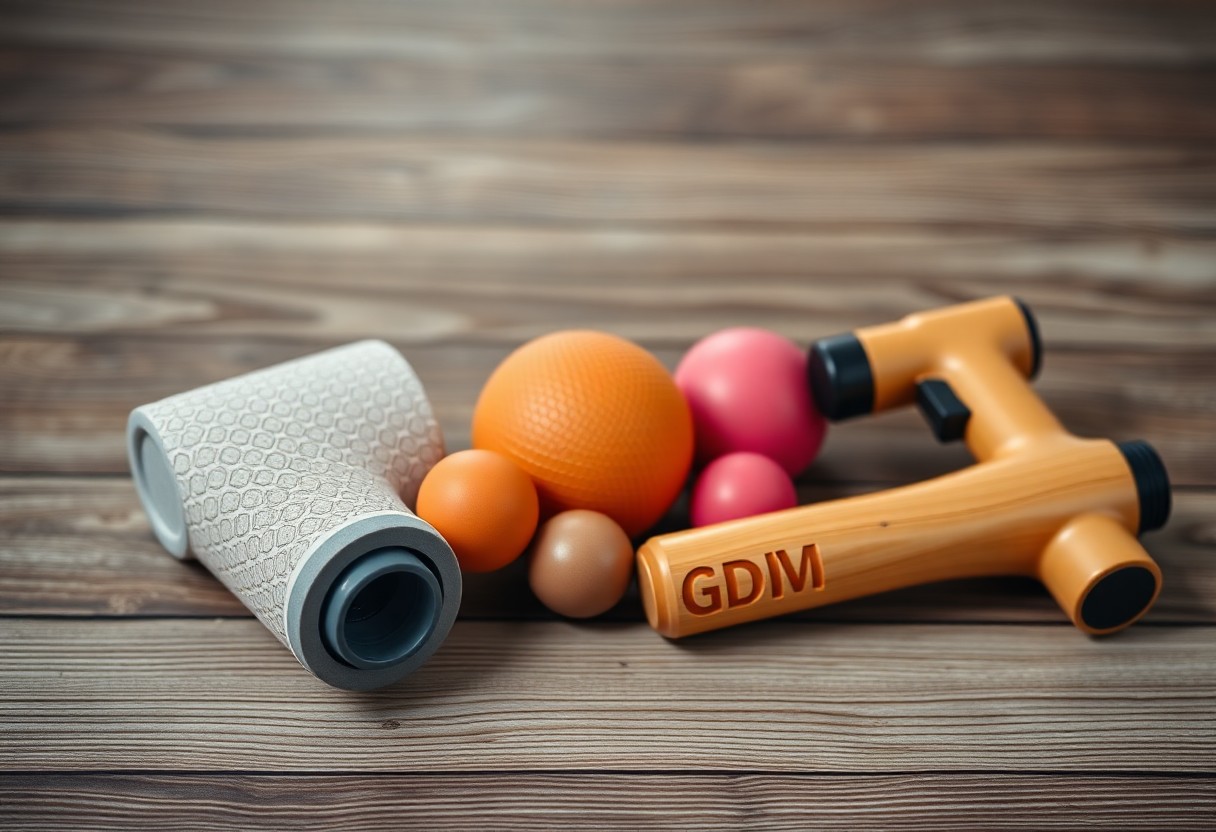
  • Tools and Techniques: Utilize common items like tennis balls or foam rollers to enhance your self-massage experience.
  • Pressure and Duration: Apply consistent, gentle pressure for 10-30 seconds on tight spots to effectively relieve muscle tension.
  • Breathing: Incorporate deep breathing exercises while massaging to promote relaxation and enhance the overall experience.
  • Regular Practice: Consistently practicing self-massage can significantly improve flexibility and overall well-being.

Understanding Self-Massage

While self-massage offers a simple yet effective means to relieve tension and promote relaxation, it involves utilizing your hands, body, or tools to apply pressure to specific areas. This practice not only enhances your body awareness but also empowers you to take control of your wellness journey. By familiarizing yourself with various techniques, you can tailor the experience to meet your individual needs, improving both physical and emotional well-being.

Benefits of Self-Massage

Among the numerous advantages of self-massage are improved circulation, reduced muscle tension, and enhanced flexibility. Engaging in this practice can alleviate stress and anxiety while promoting an overall sense of tranquility. By regularly incorporating self-massage into your routine, you contribute to your well-being, helping you to maintain a balanced and healthy lifestyle.

Common Techniques

By exploring common techniques, you can discover methods that suit your personal needs and preferences. Whether it involves kneading, rolling, or applying pressure with your fingers and palms, you can effectively target specific muscle groups. The techniques you choose may involve using everyday objects like tennis balls, foam rollers, or even your own hands to achieve desired results, allowing you greater flexibility in your self-care routine.

SelfMassage is a versatile practice that integrates various methods like circular motions, gentle kneading, or even tapping to stimulate areas that require relief. You might find that using tools, such as massage balls or electronic massagers, amplifies the experience, making it easier to target hard-to-reach spots. Tailoring your approach with these techniques means you’re more likely to address specific issues, whether it’s a tight shoulder or tense lower back, ensuring you maximize the benefits of your self-care efforts.

Tools and Equipment for DIY Massage

Assuming you want to enhance your self-massage experience, investing in the right tools and equipment can significantly elevate your results. Various items such as massage balls, foam rollers, and vital oils are readily available to help you target specific muscle groups and improve relaxation. By incorporating these tools into your routine, you can create an effective and enjoyable self-care practice that fits your lifestyle.

Massage Balls and Foam Rollers

About massage balls and foam rollers, they are highly effective for releasing muscle tension and improving circulation. These tools allow you to apply pressure on tight spots, making it easier to alleviate discomfort in hard-to-reach areas. With various shapes, sizes, and densities available, you can choose the perfect option to suit your needs.

Essential Oils and Creams

Before starting your DIY massage journey, consider the benefits of vital oils and creams. These products not only enhance the experience but also help in muscle recovery and relaxation. The right formulation can turn your self-massage into a soothing ritual.

Hence, using vital oils like lavender or eucalyptus can promote relaxation and relieve soreness in your muscles. Creams infused with menthol or arnica can provide a cooling or warming sensation, making your self-massage even more effective. Select the right combination that resonates with your needs, and feel the difference it makes to your practice.

Techniques for Different Body Areas

To effectively relieve tension and improve your overall well-being, it’s vital to utilize targeted self-massage techniques for various body areas. Each region of your body requires specific approaches to achieve optimal relaxation and relief from discomfort. This chapter will explore effective methods tailored for your neck, shoulders, back, arms, hands, legs, and feet, empowering you to take charge of your self-care routine.
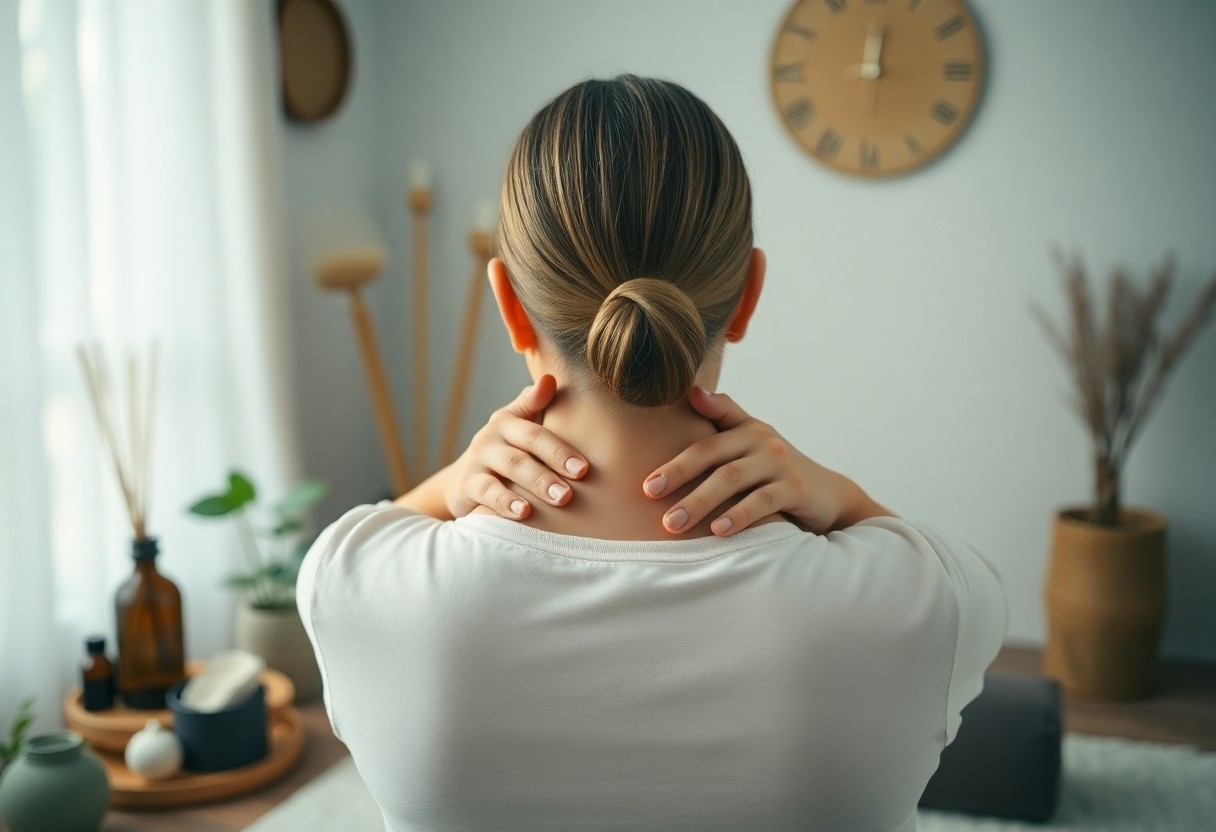
Neck and Shoulders

By applying gentle pressure with your fingertips, you can ease tension in your neck and shoulders. Start by massaging the base of your skull and gradually move down to your shoulders, using small circular motions or kneading techniques. Remember to breathe deeply as you work on these areas to enhance relaxation.

Back and Lower Back

Across your back, you can use both hands to apply pressure along the spine, promoting a sense of relief. Target areas that feel particularly tight by using your palms or fingertips to knead the muscles. Focus on the lower back by placing a tennis ball against a wall and gently rolling it to release tension.

To enhance your back and lower back relaxation, incorporate lying down on your back with a rolled-up towel under the arch for support. Utilize your palms to press firmly but gently along your lower back. This technique helps alleviate discomfort from prolonged sitting and encourages blood circulation in the area.

Arms and Hands

By starting at your shoulders and working down to your fingertips, you can perform a sequence of self-massage strokes on your arms and hands. Use your opposite hand to squeeze the muscles in your arms and gently pull on each finger, finishing with circular motions on the palms to promote circulation.

Consequently, emphasizing the importance of wrist and hand flexibility will aid in reducing stiffness and discomfort. For optimal relaxation, integrate stretching techniques alongside your self-massage, such as extending your fingers apart and rotating your wrists to relieve tension accumulated from daily activities.

Legs and Feet

After a long day, using your thumbs to apply pressure along your calves and thighs can significantly improve blood flow and alleviate soreness. Conclude your session with a gentle massage of your feet, as this area carries the weight of your entire body.

Hands can effortlessly target specific pressure points in your feet, such as the heels and arches, using your thumbs or fingers. Incorporate ankle rotations and foot stretching into your practice to enhance mobility and relaxation, ensuring your legs and feet feel rejuvenated and energized.

Timing and Frequency

For effective self-massage, understanding timing and frequency can enhance your overall experience and benefits. Incorporating self-massage into your daily routine allows you to alleviate tension and promote relaxation. Aim for consistency, as regular practice can lead to significant improvements in your physical and mental well-being.

When to Self-Massage

Between busy schedules and various responsibilities, it’s crucial to carve out time for self-massage. Ideal moments include early mornings to start your day relaxed, during lunch breaks to relieve stress, or in the evenings to unwind before bed. Listening to your body will guide you in choosing the right time.

Recommended Duration

One effective self-massage session typically lasts between 5 to 20 minutes, depending on your needs and available time. This duration allows you to focus on specific areas without feeling rushed. Tailoring your session to your comfort level and areas of tension will yield the best results.

Frequency is key in maximizing the benefits of your self-massage sessions. Aim for at least two to three sessions per week to maintain muscle health and alleviate stress. If you’re experiencing heightened tension or discomfort, consider increasing the frequency to daily or even multiple times a day. Adjust your duration and frequency based on your personal comfort and needs, creating a self-care routine that works for you.

Safety Precautions

Keep in mind that while self-massage can be beneficial, practicing safety precautions is important to avoid injury. Ensure you’re in a comfortable position, free from distractions, and avoid using excessive force. If you have any medical conditions or are pregnant, consult a healthcare professional before proceeding with self-massage techniques. Always have a clear understanding of your body’s limitations to prevent adverse effects.

When to Avoid Self-Massage

After any recent injury, surgery, or if you suspect a serious medical condition, it’s best to avoid self-massage. If you experience severe pain, swelling, or inflammation, refrain from using self-massage techniques until consulting with a healthcare professional. Additionally, if you have skin conditions, open wounds, or infections, self-massage should be avoided to prevent further complications.

Listening to Your Body

Beside the techniques you use, it’s vital to pay attention to your body during self-massage. Each individual’s sensitivity varies, and any discomfort or pain should be noted. Adjust pressure or technique accordingly. If you notice any adverse reactions, such as dizziness or increased pain, stop immediately. Respecting your body’s signals is vital to ensure a positive and safe self-massage experience.

And by tuning into how your body responds, you can make informed decisions about your self-care routine. Self-massage is not a one-size-fits-all approach, and personalizing your techniques based on your comfort level will yield the best results. Allow yourself the flexibility to modify methods or stop entirely if something doesn’t feel right. Prioritizing self-awareness contributes significantly to both your safety and the effectiveness of your self-massage efforts.

Incorporating Self-Massage into Your Routine

Not every self-care routine has to be time-consuming or complicated. By integrating self-massage into your daily activities, you can significantly enhance your overall well-being. Set aside just a few minutes each day to focus on areas where you hold tension, like your neck or shoulders. Consider performing these techniques while watching TV or during a coffee break. As you make self-massage a consistent part of your lifestyle, you’ll likely notice improved relaxation and reduced stress, making it easier to navigate your day with greater ease and clarity.

Final Words

So, as you explore self-massage and DIY techniques, you empower yourself to alleviate tension and enhance your overall well-being. By incorporating these methods into your routine, you can promote relaxation, improve circulation, and relieve muscle discomfort. Keep experimenting with different techniques and tools to find what works best for your unique needs. With consistent practice, you can make self-care an integral part of your lifestyle, allowing you to feel rejuvenated and more in tune with your body.

Q: What are the benefits of self-massage?

A: Self-massage offers numerous benefits, including reduced muscle tension, improved circulation, and enhanced flexibility. It can help alleviate stress and promote relaxation, making it an effective tool for self-care. Additionally, engaging in self-massage can aid in the recovery of sore muscles after workouts and contribute to an overall sense of well-being.

Q: What techniques can I use for effective self-massage?

A: There are various techniques to explore, such as kneading, rolling, and tapping. Using your hands or tools like foam rollers and massage balls can enhance the experience. Focus on areas with tightness or discomfort, applying controlled pressure and adjusting intensity based on your preferences. Moreover, integrating breathing exercises while self-massaging can deepen relaxation and increase effectiveness.

Q: How often should I perform self-massage for optimal results?

A: The frequency of self-massage depends on your personal schedule and needs. For general maintenance, engaging in self-massage 2-3 times a week can be beneficial. If you’re experiencing specific tension or soreness, you might opt for daily sessions. It’s important to listen to your body and adjust the routine based on how you feel, ensuring that you do not overdo it and allow time for muscle recovery.

How to Perform a Simple Self-Massage at Home

Just a few minutes of self-massage can significantly alleviate tension and enhance your overall well-being. This guide will walk you through easy techniques and tips to perform an effective self-massage in the comfort of your home. You’ll discover how to target specific areas, the best tools to use, and the right techniques that cater to your body’s needs. With this knowledge, you can incorporate self-massage into your daily routine, promoting relaxation and relieving stress while improving your physical health. Get ready to take charge of your self-care journey!

Key Takeaways:

  • Preparation: Create a calm environment by dimming the lights and playing soothing music to enhance relaxation during your self-massage.
  • Tools: Use items like tennis balls or foam rollers to target specific muscle groups and relieve tension effectively.
  • Technique: Apply different techniques such as kneading, rubbing, and applying pressure to various areas of your body for optimal relief.
  • Breathing: Incorporate deep breathing throughout the session to promote relaxation and increase the benefits of the massage.
  • Duration: Aim for 10-20 minutes of self-massage to experience its benefits without causing discomfort or fatigue.

Understanding Self-Massage Benefits

For anyone seeking relaxation and relief from tension, self-massage offers a multitude of benefits. Not only does it help alleviate physical discomfort, but it also promotes mental clarity and emotional well-being. Incorporating self-massage into your routine can enhance your overall quality of life, making it a powerful tool for self-care that you can easily practice at home.

Physical Benefits

Across various muscle groups, self-massage can significantly reduce tension and soreness. It promotes better blood circulation, which aids in muscle recovery and flexibility. This self-care technique can also help alleviate headaches, minimize stress in the body, and improve posture by focusing on areas where you may hold tension.

Mental Benefits

Mental well-being can significantly improve through regular self-massage practices. This method allows you to reconnect with your body and establish a sense of mindfulness. By taking time to focus on your physical self, you can effectively reduce stress levels and promote a more relaxed state of mind.

Understanding the mental benefits of self-massage extends beyond mere relaxation. As you engage in this practice, you cultivate an awareness of your body’s signals and needs, fostering a deeper connection with yourself. This mindfulness can lead to lower anxiety levels, improved mood, and a greater sense of control over your mental state, allowing you to navigate daily challenges with ease.

Setting the Right Environment

Any successful self-massage experience starts with the right environment. Aim to create a space where you feel comfortable and relaxed, free from distractions. Dim the lights or use soft lighting, and consider playing soothing music or nature sounds to help set the mood. This calming atmosphere will enhance your self-massage, allowing you to fully unwind and reap the benefits of your efforts.

Creating a Relaxing Space

Behind every effective self-massage lies a tranquil space. Choose a quiet location in your home where you can feel at ease, perhaps a cozy corner in your living room or your bedroom. Ensure the temperature is comfortable, and add personal touches like cushions or soft blankets to elevate the comfort level.

Tools and Supplies Needed

To enhance your self-massage experience, gather a few necessary tools and supplies. Items such as a massage ball, foam roller, or even your hands can be effective. Consider using oils or lotions to facilitate a smooth glide over your skin, making the process more enjoyable.

Also, think about adding extra items that can enhance your self-massage routine, such as a heating pad for sore muscles or a mirror to help you visualize your technique. A timer can help you manage your session length, allowing you to focus solely on relaxation without worrying about the time. Improving your self-massage toolkit will make your practice more effective and pleasurable.

Techniques for Self-Massage

Not all self-massage techniques are created equal; some can be more effective than others depending on which areas you target. Understanding the basic techniques, such as kneading, stroking, and applying pressure, will help enhance your self-care routine. Use your hands, fingers, and even tools like tennis balls or foam rollers to alleviate tension and improve circulation. Incorporate breathing exercises to deepen relaxation and increase the benefits of your practice.

Neck and Shoulder Massage

Against the tension that accumulates in your neck and shoulders, you can use your fingers to apply gentle kneading motions in circular patterns. Focus on the base of your skull and the top of your shoulders, where stress tends to build up the most. Incorporating deep breaths can enhance relaxation as you work through soreness and stiffness.

Back Massage Techniques

Against tightness in your back, consider using a foam roller or a tennis ball to target specific areas. Start by lying on your back with the foam roller tucked under your upper or lower back, gently rolling side to side. You can also lean against a wall with a tennis ball held between your back and the wall to massage out knots. These methods allow you to control the pressure applied and effectively reach those hard-to-reach spots, promoting relaxation and relief.

SelfMassage focuses on the areas where you often feel discomfort or tension in your back. Applying pressure with your palms, fingers, or a massage tool can provide immediate relief. Explore different techniques, such as gliding strokes or deep presses, to see what works best for you. If you find a tender spot, pause for a few seconds to allow the muscle to release. Consistency will help maintain muscle health and improve overall flexibility, making self-massage a valuable addition to your wellness routine.

Massage for Tension Relief

Despite the fast pace of daily life, you can effectively alleviate tension through self-massage techniques at home. These techniques not only promote relaxation but also improve circulation and enhance overall well-being. By dedicating a few minutes to this practice, you can release built-up tension and feel revitalized, helping you to manage stress more effectively.

Identifying Tension Points

After familiarizing yourself with your body, take a moment to locate areas where you commonly feel tightness or discomfort, such as your neck, shoulders, and lower back. You may also find tension points in your hands or feet. By paying attention to these signals, you can target your self-massage effectively, leading to greater relief.

Using Pressure Appropriately

With self-massage, it’s imperative to apply the right amount of pressure to avoid discomfort while still providing a therapeutic effect. Start with gentle pressure to assess your comfort level, gradually increasing it as needed. Effective pressure can help release knots and tightness, allowing you to relax deeper into the massage.

Consequently, adjusting your pressure allows you to customize your massage experience according to your body’s responses. Use your fingers, palms, or thumbs to control the intensity and ensure you’re not causing pain. If an area feels particularly tense, you might want to linger a bit longer while maintaining a steady pressure. This way, you’ll find the balance between relief and comfort, enhancing your overall self-massage experience.

Incorporating Essential Oils

To enhance your self-massage experience, consider incorporating imperative oils, which not only provide delightful scents but also offer therapeutic benefits. Essential oils can help alleviate stress, reduce tension in muscles, and promote relaxation. Choose a suitable oil based on the specific outcome you desire, such as lavender for calming or peppermint for invigorating effects.

Choosing the Right Oil

One way to begin is by identifying your needs. For relaxation, you might opt for soothing oils like lavender or chamomile. If you want to feel energized, citrus oils like lemon or orange can be uplifting. Understand each oil’s properties to select the best fit for your self-massage.

Blending Techniques

Against the backdrop of your chosen oils, blending techniques play a vital role in maximizing their benefits. Proper mixing ensures that the oils complement each other, creating a harmonious aroma and enhanced therapeutic effects.

Oils can be blended using a carrier oil, such as sweet almond or jojoba, which serves as a base to dilute the imperative oils. A typical ratio is 2-3 drops of imperative oil per teaspoon of carrier oil. You can experiment with combinations, such as mixing eucalyptus with lavender for relaxation and respiratory relief. Always conduct a patch test on your skin to ensure you don’t have any adverse reactions to the blend. This attention to detail will elevate your self-massage experience.

Safety Precautions and Tips

Keep your self-massage safe and effective by following these key tips:

  • Ensure your hands are clean before starting.
  • Use a comfortable position with proper support.
  • Apply gentle pressure to avoid pain or discomfort.
  • Stay hydrated before and after your session.
  • Consult a healthcare professional if you have any concerns.

Knowing how to take care of yourself safely will enhance your self-massage experience.

When to Avoid Self-Massage

After an injury or if you’re experiencing persistent pain, it’s best to avoid self-massage until you seek professional advice. Other situations where you should refrain include when you have swelling, bruises, or skin conditions. If you feel unwell or are experiencing severe discomfort, self-massage may not be suitable.

Listening to Your Body

One of the most important aspects of self-massage is listening to your body. Pay attention to any signals of discomfort, pain, or tightness and adjust your approach accordingly.

Also, be mindful of the areas you massage; if something doesn’t feel right, stop immediately. This awareness allows you to tailor your technique and pressure to what feels good for you, promoting relaxation and reducing stress. Over time, you’ll develop a better understanding of your body’s unique needs, ensuring a more beneficial and enjoyable self-massage experience.

To wrap up

To wrap up, performing a simple self-massage at home is an effective way to relieve tension and promote relaxation. Start by setting the right atmosphere, using your fingers or palms to apply pressure on areas of discomfort. Focus on your neck, shoulders, and lower back, using different techniques such as kneading and circular motions. Be mindful of your pressure levels, and don’t hesitate to explore various techniques that work best for you. Incorporating self-massage into your routine can enhance your overall well-being and provide a well-deserved moment of self-care.

Q: What equipment do I need to perform a simple self-massage at home?

A: To perform a simple self-massage at home, you don’t need much equipment. A few recommended items include:

  • Massage oil or lotion: This helps your hands glide over the skin smoothly, preventing friction.
  • Tennis ball or foam roller: These can be used to target specific muscles in your back and other hard-to-reach areas.
  • Pillows or towels: These can provide cushioning and support while you’re lying down or sitting during the massage.
  • Seated or reclining position: Comfortable seating or lying down on a mat will help you relax and effectively reach the areas you want to massage.

Q: Which areas of the body can I safely massage during a self-massage session?

A: You can safely massage several areas of your body during a self-massage, including:

  • Neck and shoulders: Use your fingers to apply pressure to tense areas. Gentle kneading can relieve stress.
  • Forearms and wrists: Rolling your forearms or gently rubbing your wrists can alleviate tension, especially if you use your hands a lot.
  • Legs and feet: Massaging your calves and the soles of your feet can help improve circulation and reduce fatigue.
  • Lower back: While it’s best to avoid the spine itself, you can massage the surrounding muscles using a tennis ball or by using your hands directly.

Q: How long should I spend on each area during a self-massage?

A: The duration of your self-massage can vary depending on your personal preference and needs. However, a general guideline is as follows:

  • 5-10 minutes: Spend this time on smaller muscle groups, like your forearms or neck, focusing on tender spots and tension.
  • 10-15 minutes: For larger areas, like your back or legs, you can take more time to ensure thorough relaxation and relief.
  • Less than 30 minutes: Overall, aim for a session of about 20-30 minutes for multiple areas to avoid overworking yourself, ensuring that each area receives adequate attention without feeling strained.

5 Tools for Effective Self-Massage

Most people experience muscle tension and discomfort at some point in their lives, making self-care routines important. Utilizing the right tools can enhance your self-massage technique, providing relief and relaxation in the comfort of your own home. In this post, you will discover five invaluable tools that can help you effectively target sore spots, improve circulation, and promote overall well-being. Equip yourself with these resources and unlock the benefits of self-massage for a rejuvenated body and mind.

Key Takeaways:

  • Foam Roller: A versatile tool that helps release muscle tightness and improve blood circulation.
  • Massage Balls: Ideal for targeting specific knots and trigger points, allowing for focused pressure.
  • Massage Stick: Convenient for on-the-go relief, this tool works well on larger muscle groups and can easily be stored.
  • Handheld Massager: Provides adjustable intensity levels for personalized massage experiences, great for relieving tension.
  • TheraGun or Percussive Massager: Offers deep tissue therapy through rapid pulses, effectively alleviating soreness and promoting recovery.

Understanding Self-Massage

For many, self-massage can seem like a luxury, but it is an accessible practice that you can integrate into your daily routine. Understanding self-massage means recognizing its potential to alleviate tension, improve circulation, and promote relaxation. By taking the time to work on your body, you can effectively ease muscle stiffness, enhance your mood, and contribute to your overall well-being.

Benefits of Self-Massage

About self-massage, you’ll find that it offers numerous benefits beyond relaxation. Regularly engaging in self-massage can help reduce stress levels, improve flexibility, and enable greater body awareness. It can also assist in releasing endorphins, contributing to better mental health, and can serve as a valuable tool in managing chronic pain or discomfort.

Common Techniques

Across various practices, you can explore common techniques such as kneading, tapping, and rolling. These methods involve using your hands, fingers, or devices to apply pressure to specific muscle groups. Self-massage can target areas like your neck, shoulders, and lower back, allowing you to adapt your approach according to your needs and preferences.

With a variety of tools at your disposal, such as foam rollers, massage balls, and even your own hands, you can incorporate these common techniques into your routine effectively. For instance, kneading involves applying circular motions with your fingers to break down muscle knots, while rolling helps distribute pressure evenly across larger muscle groups. Experiment with different methods to discover what works best for you, ensuring a personalized and effective self-massage experience.

Tool #1: Foam Roller

While self-massage techniques can vary, the foam roller is a versatile tool that effectively alleviates muscle tension and improves flexibility. This cylindrical piece of foam helps release knots and tightness in your body’s fascia, promoting better blood circulation and recovery. It’s particularly popular among athletes but is beneficial for anyone looking to enhance their self-care routine.

How to Use

Foam rolling involves using your body weight to apply pressure onto the roller and target specific muscle groups. Start by positioning the foam roller under the muscle you want to relieve tension in, and gently roll back and forth, pausing on any tight spots. Incorporate different angles and movements to fully address the area.

Target Areas

After identifying which muscles need attention, focus on commonly tight areas such as your back, hamstrings, calves, and quadriceps. These muscle groups often endure strain from daily activities or workouts, making them prime candidates for foam rolling.

In addition to the frequently targeted areas, don’t overlook your glutes and IT band, as they can also hold significant tension. By rolling these muscles, you can help alleviate discomfort, improve mobility, and prevent injuries. Pay attention to how your body feels during and after rolling, adjusting your technique based on feedback from your muscles.

Tool #2: Massage Balls

Once again, massage balls prove to be an indispensable tool for self-massage. They are compact, versatile, and can target specific trigger points in your muscles. Whether you are looking to relieve tension in your back, shoulders, or feet, these little spheres can help you achieve greater relaxation and pain relief. Just roll the ball over the tense areas, and you will feel the benefits very quickly.

Types of Massage Balls

Massage balls come in various types to cater to different needs. Here’s a quick overview:

Type Description
High-Density Foam Balls Great for deep tissue massage and trigger points.
Rubber Balls Provide firmer pressure and are often used for foot massage.
Massage Lacrosse Balls Excellent for larger muscle groups and targeted areas.
Self-Inflatable Balls Adjust firmness by inflating or deflating as needed.
Textured Balls Enhance stimulation and provide a different sensation.

This variety allows you to choose the best option for your massage needs and preferences.

Techniques for Effective Use

After selecting the right massage ball, you’ll want to use it effectively for the best results. Start by positioning the ball on the targeted muscle group, then gently apply your body weight to it. You can control the pressure by shifting your weight or adjusting the position of the ball.

Due to the compact nature of massage balls, they allow you to control the intensity of your massage. You can roll the ball slowly over sore areas, applying more pressure as you become comfortable. It is also beneficial to integrate specific movements, such as twisting or shifting your stance, which can help release built-up tension and enhance your experience. Just be sure to listen to your body and adjust accordingly for optimal relief.

Tool #3: Massage Sticks

Keep your body feeling rejuvenated and your muscles relaxed with massage sticks, versatile tools designed to apply targeted pressure to specific muscle groups. Ideal for runners, fitness enthusiasts, or anyone dealing with muscle tension, these handheld devices make it easy for you to relieve tightness and improve circulation anywhere and anytime. Their portability and ease of use make them a perfect addition to your self-care routine.

Advantages of Massage Sticks

By using massage sticks, you gain the ability to control the intensity and pressure of your treatment. They allow you to easily reach areas that are typically hard to massage, like your back and thighs, promoting blood flow and reducing muscle soreness. Additionally, they can enhance flexibility and accelerate recovery after workouts.

Best Practices for Use

Before using your massage stick, ensure that you warm up your muscles with some light stretches or light activity. Start with gentle pressure and gradually increase as needed, targeting areas where you feel tension. You can use the stick in circular motions or glide it along the length of your muscles, always listening to your body’s response to find the most effective spots for relief.

Also, it’s beneficial to incorporate deep breathing while using the massage stick to enhance relaxation and increase effectiveness. Focus on a specific muscle group for about one to two minutes, adjusting the pressure based on your comfort level. Following your massage, hydrate well to help flush out toxins released during the process and keep your muscles in peak condition.

Tool #4: Percussion Massagers

All of us can benefit from the rapid relief provided by percussion massagers, which are designed to deliver pressure directly to your muscles through quick, repetitive taps. These devices help to alleviate soreness, enhance muscle recovery, and improve overall circulation, making them a popular choice for athletes and anyone dealing with muscle tension. With a range of settings and attachments, percussion massagers easily fit into your self-care routine, allowing for targeted treatments tailored to your needs.

Mechanism of Action

Below the surface, percussion massagers employ a mechanism that sends quick bursts of pressure into your muscle tissues. This stimulates blood flow and encourages the release of tension by mimicking the effects of manual massage. The rapid percussion can penetrate deep into muscle fibers, disrupting knots and facilitating quicker recovery times. It’s an effective way to relax localized stiffness and improve your range of motion.

User Recommendations

On many occasions, users find percussion massagers to be beneficial for muscle recovery after workouts, reducing soreness by incorporating them into their post-exercise routine. For optimal results, it’s advisable to apply pressure on the areas experiencing tightness for a duration of 30 seconds to 2 minutes, moving slowly across the muscle. You may also want to experiment with different speed settings and attachments to discover what feels best for your unique needs.

To maximize your experience with percussion massagers, focus on areas that often carry tension, such as the upper back, shoulders, and thighs. Listen to your body’s responses and adjust the intensity accordingly, aiming for a comfortable sensation rather than discomfort. Incorporate these sessions into your regular self-care habits, especially after physical activities or long days at a desk, to help keep your muscles relaxed and prevent stiffness.

Tool #5: Handheld Massagers

Unlike traditional massage techniques that require a partner or a visit to a therapist, handheld massagers provide you with the flexibility to target specific areas of tension on your own. These devices are designed for personal use, allowing you to enjoy the benefits of massage therapy in the comfort of your home. With various settings and attachments, handheld massagers can address muscle soreness, stiffness, and promote relaxation whenever you need it.

Features to Consider

Below are key features to look for when selecting a handheld massager: consider the weight, ease of use, and versatility. Opt for one with adjustable intensity levels and different massage heads to cater to various muscle groups. Additionally, a cordless option offers more mobility, making it convenient to use in any setting.

Where to Apply

Apply your handheld massager to areas of muscle tension, such as your neck, shoulders, lower back, and thighs. Focus on tight muscles, knots, or sore spots to enhance circulation and alleviate discomfort.

In fact, targeting specific areas like the neck and shoulders can greatly relieve tension accumulated from daily stress or poor posture. You can apply the massager in a circular motion or glide it along the muscle fibers for effective results. Don’t hesitate to experiment with different pressure levels and techniques to find what feels best for you, making your self-care regimen more effective and enjoyable.

Final Words

Conclusively, utilizing the right tools for effective self-massage can greatly enhance your overall well-being and alleviate tension. Whether you’re using a foam roller, massage ball, or handheld device, each tool offers unique benefits to cater to your specific needs. Incorporate these tools into your routine to ensure you’re taking care of your body. If you’re looking for additional insights, check out the community discussions on What are your favorite self massage tools? for more ideas and tips.

FAQ

Q: What are the benefits of using self-massage tools?

A: Self-massage tools offer a variety of benefits, including improved circulation, reduced muscle tension, and enhanced relaxation. They can help alleviate tightness in specific areas, promote flexibility, and aid in recovery after exercise. Additionally, these tools can provide a convenient and cost-effective way to manage stress and support overall well-being.

Q: How do I choose the right self-massage tool for my needs?

A: Choosing the right self-massage tool depends on several factors, including the specific areas of your body that require attention, your level of experience with self-massage, and your personal preferences. For targeted pressure, tools like massage balls or targeted rollers may be ideal, while larger foam rollers can help with broader muscle groups. Consider trying different types to see which ones provide the most relief and comfort for you.

Q: How often should I use self-massage tools for the best results?

A: The frequency of using self-massage tools can vary based on individual needs and lifestyle. Many people find incorporating self-massage into their routine two to three times a week is beneficial. However, if you are recovering from an injury or experiencing chronic pain, you might benefit from more frequent sessions. Listening to your body is important—if you feel tightness or tension, it may be a sign to use the tools more often.

DIY Head Massage for Headache Relief

Relief from headaches can be as simple as a DIY head massage, enabling you to ease tension and promote relaxation right at home. You might be surprised to learn that targeting specific areas of your head and neck can significantly alleviate discomfort. By incorporating some easy-to-follow techniques, you can cultivate your self-care routine effectively. For a deeper understanding of Headache Trigger Points & Self-Massage Techniques, consider exploring resources that guide you through this beneficial practice. Your head deserves this gentle attention, making a head massage an empowering approach to managing headaches.

Key Takeaways:

  • Relaxation: A DIY head massage promotes deep relaxation, helping to alleviate tension that contributes to headaches.
  • Pressure Points: Focusing on specific pressure points can effectively reduce pain and discomfort associated with headaches.
  • Circulation: Increasing blood circulation through massage can relieve headache symptoms and restore overall well-being.
  • Essential Oils: Incorporating imperative oils like lavender or peppermint can enhance the massage experience and provide additional headache relief.
  • Regular Practice: Making head massages a regular practice can lead to long-term benefits in managing stress and preventing headaches.

Understanding Headaches

For many, headaches can be a common yet distressing experience. Understanding the different types and triggers associated with headaches is crucial for effective relief. By recognizing the specific characteristics of your headache, you can better tailor your approach to alleviate the discomfort and enhance your well-being.

Types of Headaches

For effective headache management, it’s vital to identify the type of headache you are experiencing. There are several categories, each with distinct causes and symptoms:

  • Tension headaches
  • Migraine headaches
  • Cluster headaches
  • Sinus headaches
  • Rebound headaches

Knowing the type of headache you encounter can lead to targeted treatment options.

Type of Headache Description
Tension Headache Often caused by stress or muscle tension.
Migraine Usually characterized by severe throbbing pain.
Cluster Headache Rare but extremely painful, occurring in cycles.
Sinus Headache Related to sinus infections and sinus pressure.
Rebound Headache Result from overusing headache medication.

Common Triggers

With headaches, recognizing common triggers can help you avoid potential pain episodes. Many factors contribute to the onset of headaches, from lifestyle choices to environmental influences.

To manage your headaches effectively, consider keeping a headache diary to track your symptoms alongside potential triggers. Common triggers include stress, certain foods, dehydration, lack of sleep, and environmental factors like strong odors or bright lights. Understanding and identifying these triggers can help you take proactive measures to reduce the frequency and severity of your headaches.

Benefits of Head Massages

Now, you may be wondering how head massages can assist in relieving headaches and improving your overall well-being. Head massages offer a multitude of benefits ranging from soothing physical discomfort to enhancing your mental clarity. By incorporating this simple practice into your routine, you can experience noticeable positive effects on both your body and mind.

Physical Benefits

Around your head and neck area, tension often accumulates due to stress or prolonged positions. By engaging in regular head massages, you can alleviate muscle tightness, improve circulation, and reduce overall discomfort. This practice not only eases headache symptoms but also promotes relaxation, allowing your body to recover and rejuvenate more effectively.

Mental Benefits

Along with physical relief, head massages have significant mental benefits as well. They can help reduce stress and anxiety levels, leading to improved emotional well-being and clarity of thought. By taking the time to nurture your mind, you cultivate a more balanced state of being.

Massages can create a calming effect, helping you release endorphins, which are natural mood lifters. This process allows you to step away from daily distractions and connect with yourself, fostering mindfulness and a sense of tranquility. As you practice this technique regularly, you may notice enhanced focus and creativity, which are important for both your personal and professional life.

Preparing for a DIY Head Massage

Unlike traditional spa treatments, preparing for a DIY head massage at home requires just a bit of intention and setting. You can easily create an atmosphere conducive to relaxation and relief from headaches. Start by choosing a comfortable space in your home where you feel at ease. This will help you dive deeper into the experience and maximize the benefits of the massage.

Tools and Materials Needed

Massage oils or lotions can enhance your DIY head massage, making it smoother and more soothing. You may also want to gather a soft towel, a comb or brush, and a soothing playlist of your favorite calming sounds or music. These materials will help make your massage session enjoyable and effective.

Creating a Relaxing Environment

Environment plays a significant role in how effective your DIY head massage will be. To create a tranquil setting, dim the lights in the room and eliminate any distractions, such as loud sounds or clutter. If you enjoy aromatherapy, consider using vital oils or scented candles to further enhance your relaxation.

Creating a peaceful ambiance can be as simple as adjusting the lighting and playing soft music or nature sounds. You might also consider adding comfort items like cushions or a blanket to enhance your physical comfort. Choosing a quiet time when you are least likely to be interrupted can make all the difference, allowing you to fully immerse yourself in the relaxing experience of your head massage.

Techniques for Effective Head Massage

Your journey to headache relief through head massage begins with the right techniques. By focusing on specific areas of your head and neck, you can alleviate tension and promote relaxation. Incorporating various methods such as kneading, stroking, and circular motions can enhance the overall effectiveness of your massage, making it a powerful tool in managing headache symptoms.

Basic Massage Techniques

Against the backdrop of stress and tension, simple basic techniques can significantly elevate your head massage experience. Use your fingertips to gently knead your scalp in small circular motions, gradually increasing pressure. You can also try stroking your temples and the base of your skull, employing a smooth and rhythmic motion to encourage relaxation and improve circulation.

Pressure Points for Headache Relief

Massage different pressure points across your head to help diminish headache pain and discomfort. Applying pressure to specific areas can unlock relief, providing soothing sensations that ease tightness and tension.

Further exploring pressure points, you may find that the “Yintang” point, located between your eyebrows, effectively alleviates stress and anxiety. The “Taiyang” point, situated at the temples, can also be a powerhouse for relieving throbbing pain, especially during migraines. Take time to explore these points, pressing gently with your fingers to provide a calming effect and enhance your overall well-being.

Incorporating Essential Oils

Many people find that incorporating important oils into their DIY head massage enhances the overall experience and effectiveness. Essential oils can offer aromatic and therapeutic benefits, which may help alleviate headache symptoms. By blending various oils with a carrier oil, you can create a soothing mixture that not only relaxes your muscles but also elevates your mood and calms your mind.

Recommended Essential Oils

One popular choice for headache relief is peppermint oil, known for its invigorating and cooling properties. Lavendar oil is another great option, known for its calming effects that can soothe tension. Eucalyptus oil can also be beneficial, providing a refreshing scent that may help clear the mind. Combine these with a carrier oil for a safe and effective massage blend.

How to Use Essential Oils in Massage

Oils can significantly enhance the benefits of your head massage, but they should always be used correctly. Dilute important oils in a carrier oil, such as coconut or almond oil, before applying them to your scalp or temples. This not only ensures safety but also allows your skin to effectively absorb the therapeutic properties of the important oils.

A simple method to use important oils in your massage is to blend 3-4 drops of your chosen important oil with one tablespoon of carrier oil. After mixing, gently massage the blend into your scalp in circular motions. Focus on areas where you feel tension or pain, and allow the calming aroma to provide extra relief as you breathe deeply during the process. This approach can transform an ordinary massage into a holistic wellness treatment for headache relief.

Tips for Frequency and Duration

Despite the varying severity of headaches, establishing a consistent routine for your DIY head massage can significantly enhance its effectiveness. Consider these tips for optimal frequency and duration:

  • Repeat your massage sessions 2 to 3 times a week.
  • Spend at least 10-15 minutes on each session.
  • Stay attuned to your body’s signals to adjust frequency accordingly.

Assume that regular practice will help reduce the intensity and frequency of your headaches over time.

Recommended Frequency

Below is a guideline for how often you should perform your head massage. Aim for a frequency of two to three sessions per week, allowing ample time for your muscles to recover while still providing the relief you seek. You may adjust this based on your individual headache patterns or any specific needs.

Duration for Optimal Results

Any session lasting 10 to 15 minutes should suffice for effective results. This time frame allows you to fully engage with each technique, ensuring you cover all necessary areas of tension and discomfort.

The duration of your head massage plays a significant role in achieving relief from headaches. Dedicating around 15 minutes can help you to deeply penetrate the muscles and tissues that may be contributing to your headache. Moreover, staying consistent with this duration can lead to cumulative benefits, as regular relaxation of these muscle groups may reduce the frequency and severity of headache episodes over time.

To wrap up

With this in mind, incorporating a DIY head massage into your wellness routine can significantly enhance your ability to alleviate headache symptoms. By using simple techniques and applying pressure to key areas, you can promote relaxation, improve circulation, and ease tension. Not only is this approach cost-effective, but it also empowers you to take an active role in managing your discomfort. So, the next time you feel a headache coming on, consider giving yourself a soothing head massage for effective relief.

Q: What are the benefits of performing a DIY head massage for headache relief?

A: A DIY head massage can provide several benefits for individuals suffering from headaches. Firstly, it improves blood circulation in the head and neck area, which can alleviate tension and reduce pain. Secondly, massaging specific pressure points can release endorphins, the body’s natural painkillers, promoting relaxation and comfort. Additionally, the act of focusing on self-care can decrease stress levels, contributing to a more overall sense of well-being.

Q: How do I effectively perform a DIY head massage at home?

A: To perform a DIY head massage, begin by finding a comfortable and quiet space where you can relax. Start with gentle circular motions using your fingertips at the temples, then move on to the scalp, applying light pressure with your palms. You can also target the neck and shoulder areas to relieve tension. Use oils, such as coconut or lavender, to enhance the experience and promote relaxation. Aim for a massage session lasting between 10 to 15 minutes to maximize benefits.

Q: Are there any specific techniques for targeting tension headaches with a head massage?

A: Yes, there are specific techniques that can help alleviate tension headaches. One effective method is the “squeeze and release” technique, where you lightly squeeze the temples and hold for a few seconds before releasing. Another technique is to apply pressure to the base of the skull where it meets the spine, using your thumbs for added pressure. Massaging the area between the eyebrows and the forehead can also provide relief. Applying consistent pressure and using soothing motions can help ease the headache symptoms effectively.

Foot Massage Techniques You Can Try at Home

Just because you’re at home doesn’t mean you can’t treat yourself to a soothing foot massage. In this post, you will discover easy and effective techniques that you can use to relieve stress, improve circulation, and pamper your tired feet. Whether you’ve had a long day or simply want to indulge yourself, these methods will guide you in creating a calming massage experience right in your living room. Grab some lotion, find a comfortable spot, and let’s explore the world of foot massage together!

Key Takeaways:

  • Relaxation: Foot massage techniques promote relaxation and help relieve tension in the muscles.
  • Circulation: Regular foot massage can improve blood circulation, which is beneficial for overall foot health.
  • Techniques: Simple methods such as kneading, stroking, and applying pressure can be effective and easy to learn.
  • Tools: Consider using tools like massage balls or rollers to enhance your at-home foot massage experience.
  • Frequency: Incorporating foot massages into your routine a few times a week can yield the best results.

Benefits of Foot Massage

To truly appreciate the value of foot massage, it’s important to recognize its wide-ranging benefits that go beyond mere relaxation. Engaging in regular foot massages can enhance your overall well-being by promoting better circulation, relieving pain, and even aiding in the reduction of stress. The simple act of massaging your feet can be a powerful tool for self-care, helping you feel rejuvenated and more in tune with your body.

Physical Benefits

At the core of foot massage are numerous physical advantages. By applying pressure to specific areas on your feet, you can stimulate nerves, improve blood flow, and alleviate tension throughout your body. This practice can also help reduce foot pain, soothe tired muscles, and promote faster recovery after long periods of standing or intense activity.

Mental and Emotional Benefits

Below the surface, foot massages deliver significant mental and emotional rewards. The soothing experience can help reduce anxiety and enhance overall mood by promoting the release of endorphins, the body’s natural feel-good hormones. By dedicating time to pamper your feet, you’re also engaging in self-care, which is crucial for maintaining emotional balance and resilience.

A foot massage not only encourages physical relaxation but also fosters a sense of mindfulness. When you focus on your feet and the sensations they experience, you can create a greater awareness of your body and diminish the noise of everyday stressors. Incorporating this mindfulness into your routine may lead to improved emotional health, helping you navigate life’s challenges with greater patience and clarity.

Essential Tools for Foot Massage

While a good foot massage can be achieved with just your hands, having the right tools can enhance the experience and provide deeper relief. Various items can amplify your technique and help you target specific areas. It’s necessary to know what tools can help you create a soothing and effective massage environment in the comfort of your home.

Massage Oils and Creams

At the outset, using a quality massage oil or cream can significantly improve your foot massage experience. These products provide the necessary slip for your hands, allowing for smoother movements without irritating your skin. You can choose oils infused with necessary fragrances like lavender or peppermint to add an aromatic touch, making your massage even more relaxing.

Tools and Equipment

Across a variety of options, tools and equipment can aid your foot massage process. From massage balls to wooden rollers, these instruments are specifically designed to help you reach those tough spots that your fingers might miss. Additionally, foot spas and electronic massagers can offer soothing heat and vibration, targeting sore areas more effectively than manual techniques alone.

For instance, you might consider investing in a foam roller or a massage ball. These tools allow you to apply pressure effectively on your arches or the balls of your feet. A wooden foot roller can also be a fantastic addition, providing controlled pressure from the comfort of your chair, while heat packs can relieve tension beforehand or afterward. Each tool can help you tailor your foot massage experience to meet your personal comfort and relaxation needs.

Basic Foot Massage Techniques

Unlike professional massages, you can easily perform basic foot massage techniques at home to alleviate tension and promote relaxation. By following simple methods, you can enhance your well-being and enjoy the benefits of self-care. For an in-depth guide, check out How to Massage Your Own Feet: Ultimate Guide – Spa Theory.

The Effleurage Technique

To begin your foot massage, use the effleurage technique, which involves long, smooth strokes to warm up the muscles and increase circulation. Start at your ankle and move up toward your toes, applying gentle pressure with your palms and fingers. This soothing technique not only relaxes your feet but also sets the stage for deeper massage techniques.

The Kneading Technique

Effleurage is followed by the kneading technique, which focuses on targeting specific areas of tension in your feet. You apply pressure with your thumbs or fingers, working in a circular motion to relieve stiffness and stimulate blood flow. This technique can be especially effective for soothing sore spots, providing instant relief to tired muscles.

Due to its ability to break down knots in the muscles, kneading promotes relaxation while improving flexibility. You can knead each part of your foot, including the arch, heel, and balls, using varying pressure levels based on your comfort. This personalized approach allows you to address any discomfort, making your at-home foot massage more effective.

Targeting Specific Areas

After a long day on your feet, targeting specific areas of your foot can provide significant relief and relaxation. Focus on areas where you feel tension or discomfort. By applying different techniques to these spots, you can enhance your overall foot health and general well-being. Understanding how to effectively address these areas will make your massage sessions more beneficial and enjoyable.

Arch and Heel Massage

Specific techniques for massaging your arch and heel involve applying pressure with your thumbs or a massage ball. Start by placing your fingers under the arch, using a gentle rocking motion to stimulate blood flow. For the heel, apply focused pressure using your palm or fist to alleviate tension and soreness. This technique promotes relaxation and flexibility in your feet.

Toes and Ankle Focus

On the other hand, addressing your toes and ankles can enhance your foot massage experience. Gently pulling, rolling, and squeezing each toe can relieve tightness and improve range of motion. Additionally, paying attention to your ankles with circular motions can reduce stiffness and promote better circulation.

Ankle flexibility is imperative for your overall mobility. As you massage this area, use your thumbs to apply firm yet gentle pressure along the sides of your ankle. This technique helps alleviate tension and can improve your foot’s stability. By incorporating toe stretches and ankle rotations, you can enhance your foot health, making it easier to stay active and on the move.

Incorporating Reflexology

Keep in mind that reflexology can enhance your foot massage experience by targeting specific points that correspond to different organs and systems in your body. By integrating reflexology techniques into your routine, you not only promote relaxation but also stimulate overall health. This ancient practice is a valuable tool for managing stress and improving circulation, making it perfect for a rejuvenating home experience.

Understanding Reflexology

For you to fully appreciate reflexology, it’s important to understand that this practice involves applying pressure to particular points on your feet. Each point is believed to connect to different areas of the body, creating a holistic approach to wellness. By focusing on these areas, you may help alleviate various ailments and promote healing throughout your body.

Key Reflex Points to Stimulate

Along with general relaxation, identifying and stimulating key reflex points can enhance the benefits of your foot massage. Focus on areas that correspond to significant organs, such as the kidneys, liver, and lungs, which can lead to both physical and emotional relief.

Reflex points can be effectively located on both the soles and tops of your feet. For instance, the ball of your foot often relates to the heart and lungs, while the arch corresponds to your digestive system. Using your thumbs or fingers, apply firm yet gentle pressure to these areas in a circular or kneading motion. This targeted technique can help you release tension and promote a deeper sense of well-being throughout your entire body.

Tips for an Effective Foot Massage

For a satisfying and revitalizing foot massage, consider the following tips:

  • Use a comfortable and supportive surface.
  • Apply oil or lotion for smoother gliding.
  • Start with gentle pressure to warm up the feet.
  • Focus on any sore or tense areas.
  • Vary your techniques to keep the massage interesting.

This will enhance the overall experience and effectiveness of your massage.

Creating the Right Environment

Creating a soothing atmosphere is key to an enjoyable foot massage. Dim the lights, play soft music, and use calming scents like lavender. Ensure the temperature is comfortable, and consider using a comfortable chair or soft floor mat. These elements help relax the recipient, allowing them to fully benefit from the massage.

Communication with the Recipient

About communication, it’s vital to engage with the person receiving the massage. Ask about their preferences in pressure and techniques to ensure comfort. Encourage them to voice any discomfort or areas they’d like you to focus on. This mutual understanding enhances the experience, making it more tailored to their needs.

Another important aspect of communication is checking in during the massage. Ask for feedback about pressure levels and comfort, as this will help you adjust your techniques in real-time. This ongoing dialogue not only improves effectiveness but also reassures the recipient that their needs are being prioritized, leading to a more satisfying experience overall.

To wrap up

So, by experimenting with various foot massage techniques at home, such as using your thumbs for kneading, applying pressure to reflex points, and incorporating a soothing foot soak, you can significantly enhance your overall well-being. These simple yet effective methods allow you to relieve stress, improve circulation, and provide relaxation after a long day. With just a bit of practice, you can tailor these techniques to suit your specific needs, ensuring that your feet receive the care and attention they deserve.

FAQ

Q: What are some effective foot massage techniques I can use at home?

A: There are several effective techniques you can try at home. One popular method is the thumb walk, where you use your thumbs to apply pressure along the sole of the foot, moving from the heel towards the toes in a walking motion. Another technique is the kneading method, which involves using your fingers to squeeze and roll the foot, targeting areas like the arch and the balls of the feet. Additionally, you can try the ankle rotation technique, where you gently rotate the ankle in circles to relieve tension. Always listen to your body and adjust the pressure based on your comfort level.

Q: How long should I spend on a foot massage at home?

A: The duration of a foot massage can vary depending on your personal preference and the time you have available. Generally, spending about 10 to 20 minutes on each foot can provide sufficient relief and relaxation. If you’re targeting specific sore spots, you might want to focus on those areas for a longer period, around 2 to 5 minutes each. It’s important to gauge how your feet feel during the massage and adjust the time accordingly to achieve optimal relaxation.

Q: What tools or oils can enhance my foot massage experience at home?

A: Using tools and oils can significantly enhance your foot massage experience. You might consider a massage ball or a wooden foot roller to help address knots and tension. Essential oils, such as peppermint or lavender, can be mixed with a carrier oil (like coconut or almond oil) to provide both aromatherapy benefits and lubrication during the massage. Just a few drops of crucial oil added to your massage oil can elevate the experience, making it more soothing and enjoyable.

Massage Parlour Near Me Skip to content